Today I will tell you How to Generate APK for Google Play Console in Android Studio and submit it to Google Play Console.
Here I am going to tell you 2 ways so that you can share your android application with your friends to test and if you want to submit it in google play console then what process you have to do for that.
More Related Questions
- Install Android Studio On Windows 10 – Part 1.
- Convert a Website to Android App – Part 2.
- Add Splash Screen To Your Android Application – Part 3.
- Enable Download Button In Webview Android App 2021 – Part 4.
- How To Publish Android App on Google Play Store – Part 6.
Create Test APK File For Your Friends – Google Play Console
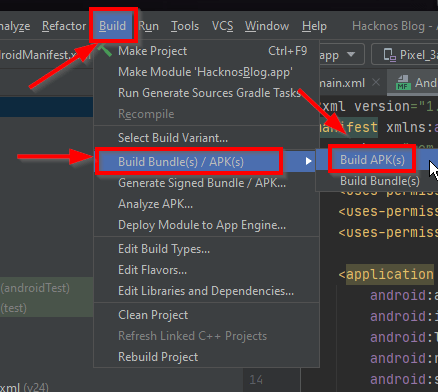
First of all, you have to open android-studio where you have created an application by coating. After opening android-studio, we will click on the build option in the above menubar and then click on the build bundle from the option that opens below.
After this you will be asked whether you want to convert the application to APK or build its bundle, then here you have to select the first option because we have to convert our application to 1.apk format and share it with your friends. Have to share with.

After clicking on the option of build APK, some process will happen on the bottom section in android-studio and after some time your APK application will be ready and you will be able to share it with yourself or your friends so that they can see that your What is missing in the application?
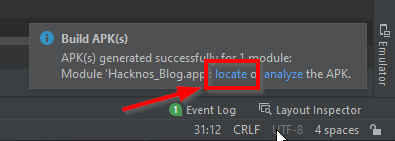
After the APK is built, you will get an option like this, here you have to click on the lock button inside the message, which will redirect you to the folder where your APK is saved after build.

After coming to the folder, you have to share the .apk format file you see at the top with your friends, this is your Android application, which you can install on your Android phone and easily check that your application is working properly. is happening or not.
Create App Bundle For Google Play Console – Google Play Console
Now I will tell you how you will convert your application into APK format so that you can easily submit it to Google Play Console and make your application accessible to the people on Google Play Store.
If you submit the application created earlier, then Google will not approve it, so you have to create the application in another way and then submit it in Google Play Console.
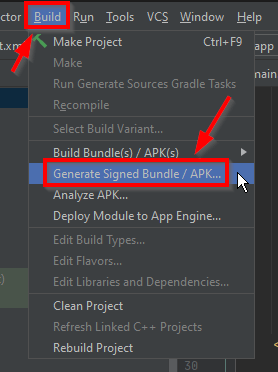
First of all, you have to open your android-studio where you have built your application, after that you have to click on the option of build in the above menubar.
After clicking on the bill option, another new I will open in front of you, out of which you have to select the Generate Signed Bundle / APk given below.
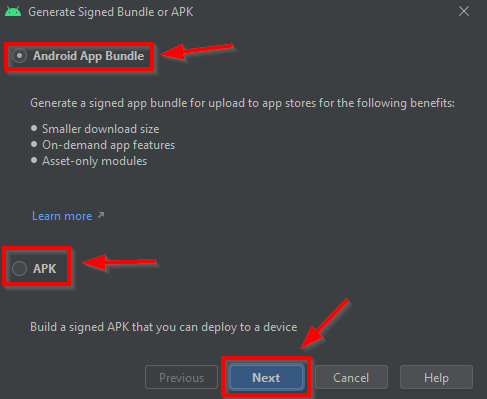
After doing this, a window of this type will open in front of you, here you can select any one option. After using both these options, you can submit your application to the Google Play Console.
But if you want some extra features in your application, then you have to select the first option android.app bundle and then click on the Next button. is.
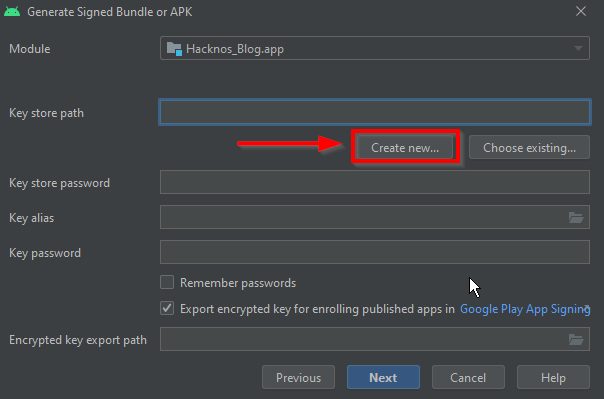
After selecting the android.app bundle, you will see a gun like this, here you have to click on the Create New button so that you can create a new bundle for your application.

After clicking on Create Bundle, such a window will open in front of you, here you have to click on the option of the folder given in the right corner and select a folder inside which you store the key of this application.
Note
Keep one thing in mind that you will select the JSP location here, you do not have to copy or cut the file saved at this location in the future. If you change this file or its location, then in the future you may have a problem in updating your Android application, then keep in mind that wherever you are saving this application key, it should be the XF location.
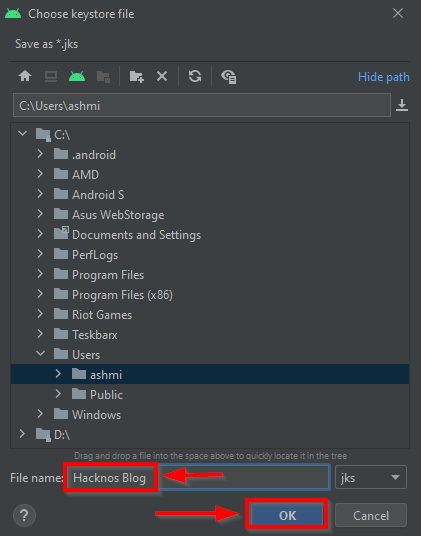
After doing this, a window will open in front of you, here you have to let the folder selected by default remain selected or you can also change it.
You have to select a folder that you do not edit much or you do not tamper with that folder and then you have to give the name of the file and click on the OK button.
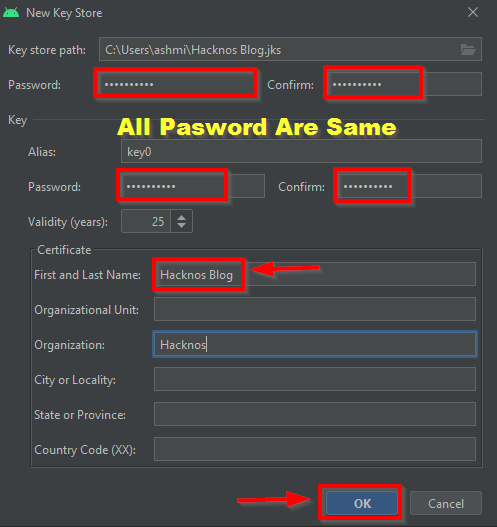
After doing this, you will come back to the previous window where you will have to fill in some details, here you will have to first give the password, for which you can choose the absolutely easy password which you can remember easily.
You have to enter this password on the requested four password options, this password should be the same everywhere. After this, you have to enter the first name last name of your website below, and then click on the OK button.
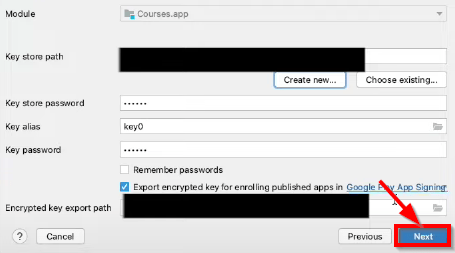
After doing this, an interface of this type will open in front of you, here you do not have to change any of the methods, you can continue this process by clicking on the Next button.
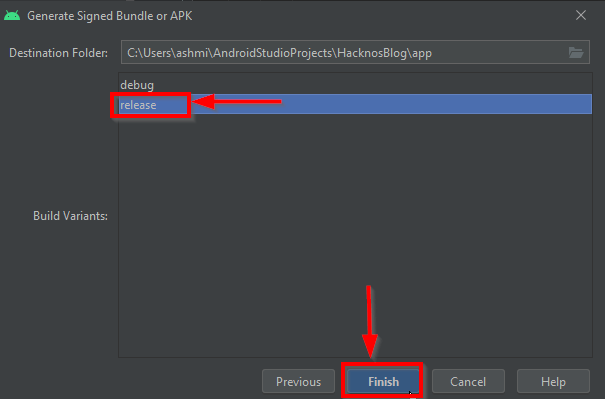
After following all the processes, now such a window will come in front of you, here you have to select the second option release and then click on the finish button so that you can finish all this process and create your android application. Get it
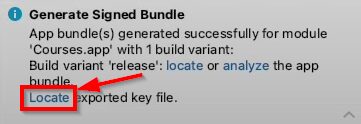
After finishing all the process, your android-studio will do some processing and then after a while, your application will be ready, which you can click on the locket button to see which folder it is from.
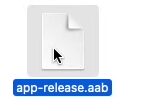
After creating the application, now you can download this application You can submit it by going to your Google Play Console and you will not face any problem in any way. Also, you will get approval on this application as soon as possible and your Android application will start appearing in Google Play Store.
Time of FAQs
Google Play Console is an android application publishing platform where you can submit any of your Android applications and after reviewing that application by Google’s team, approval is given, which you submit to Google’s play store. It is given so that more people can download your application and you can reach your application to as many people as possible. Google Play Console takes some charges for publishing your application, which you have to pay once and after that, you can use Google Play Console account for the whole lifetime without any charge.
If you want to create an account for Google Play Console and submit your Android application in it, then for that you have to go to the official website of Google Play Console from where you create an account and pay the service charges demanded by Google. After that, you can submit your Android application there. After creating an account on Google Play Console, you have to do some one-time charging for a lifetime which is $25. After this, you can submit any of your applications here.
If you want to submit your application on Google Play Console, then you will have to pay some charges for it. Google Play Console charges you $25 for your entire lifetime using its service, after which you are able to easily access all the services of Google Play Console and submit any of your Android applications here. The $25 you pay is not refundable if you want to refund the price you paid it is not possible.


