Today I will tell you How to Convert a Website to Android App. Make an Android application for any of your websites, which will look exactly like your website, and its entire design will be like your website, but today I will teach you how to make an Android application, he is a professional.
There will be an Android application with which you can bring your website to people with professional features. All the things that will be told in this article will be sent to you all number wise and delete the whole article carefully, first, you have to copy all the courses and then according to the photo given below, you can add those courses to your files. Will paste.
More Related Questions
- Install Android Studio On Windows 10 – Part 1.
- Add Splash Screen To Your Android Application – Part 3.
- Enable Download Button In Webview Android App 2021 – Part 4.
- How to Generate APK for Google Play Console in Android Studio – Part 5.
- How To Publish Android App on Google Play Store – Part 6
Convert a Website to Android App
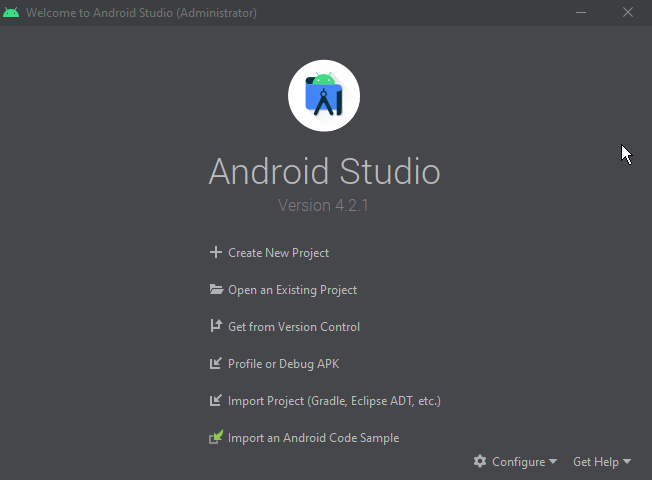
First of all, you have to open your Android studio, through which we will create a professional application that will look like your website completely. After this, you have to click on the Create New Project button,
If you are already working on an application, then you can run the exit application here so that you can continue the work of that application.
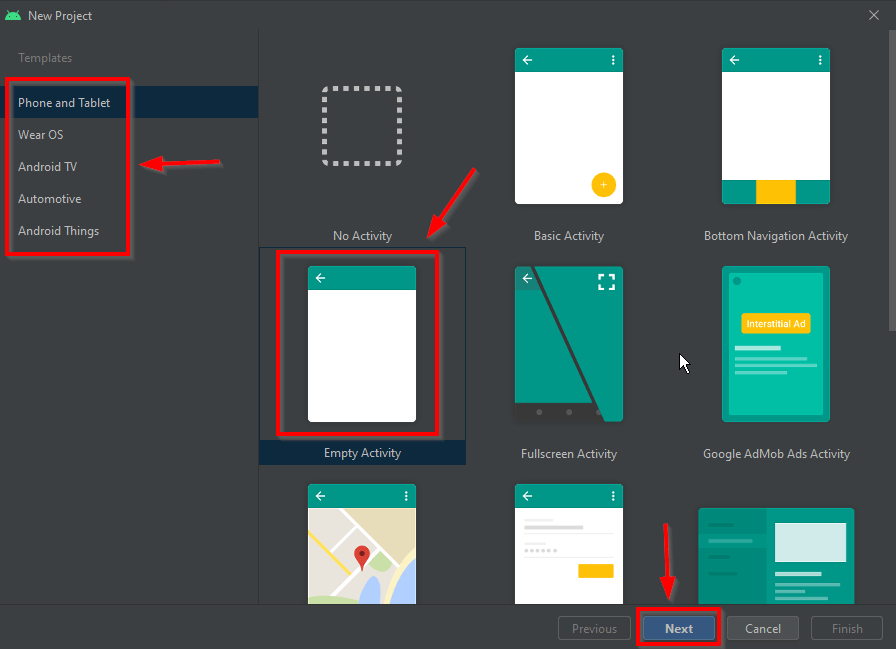
After opening the new project, some such window will open in front of you, first, you will be shown some templates in the right menu which will help you to decide for which platform or for which device you want to use the Android application.
If you want to create, here you have to select the first option phone and tablet and then select the Empty activity in the preview and click on the next button below so that you can create a new application from the very beginning and You should not be given any feature in that application.
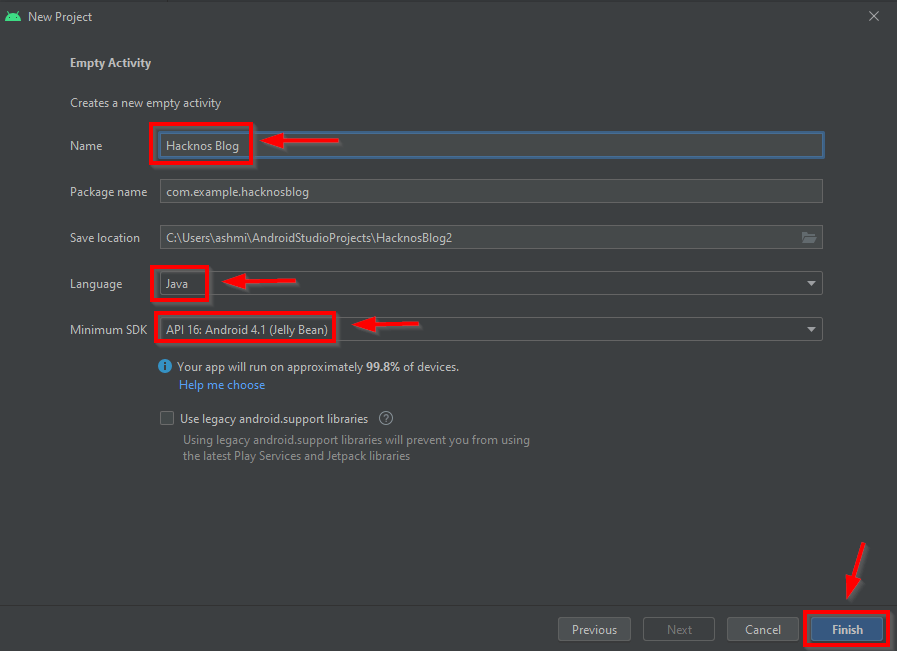
After doing this, some kind of interface will open in front of you, where you can fail some information related to your application, such as what will you name the application you want to create, after that you have to select Java in the language.
And in the section with minimum SDK, you have to select API 16: Android 4.1 (Jelly Bean) so that you can reach your Android application to a maximum number of people and their tablet and smartphone can run your application easily.

After doing this, when you use Android Studio for the first time, it may take 15 to 20 minutes for your first project to be created, then you will have to wait a bit, and then you will have some interface like this open in front of you.
Two files will appear, on which you have to work, out of which you have to first click on the file Activity_main.xlm and click on the code button given in the right corner so that the code section of this file will open in front of you.
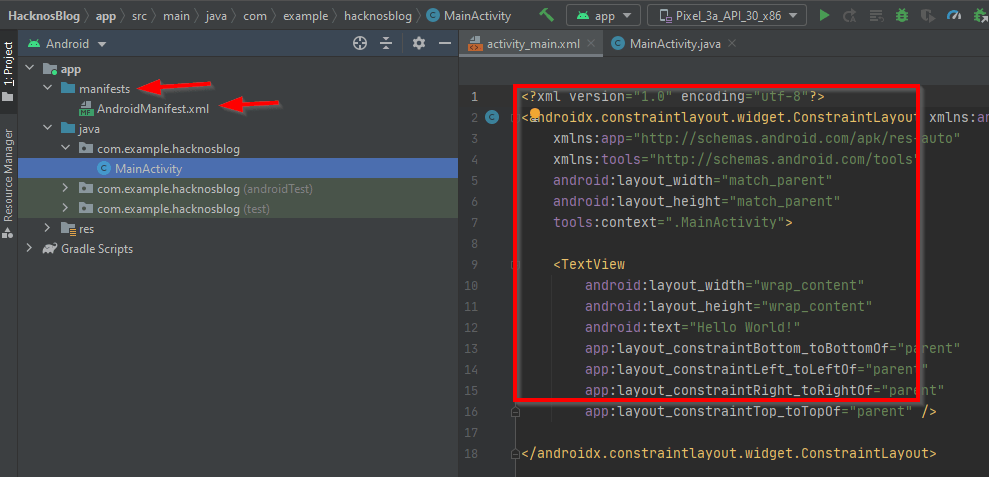
After this, you will be shown an interface like this, here you have to open another file which is manifests > AndroidMainfest.xml from the folder given in the left corner.
We also have to do a lot of coding inside this file, due to which very good features will be able to be added to your Android application.
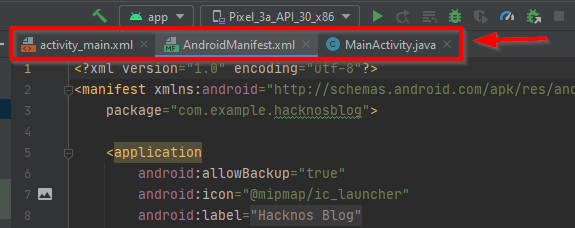
After doing all this process, three files will be open in front of you in the Android Studio district, now we can work and create an android application that will look like our website completely and any user when downloading that application.
If he does, then he can easily read and purchase all the products and articles available on our website.
1. WebView Android App Code – Convert a Website to Android App
Activity_Main.xml
|
1 2 3 4 5 6 7 8 9 10 11 |
<WebView android:layout_width="fill_parent" android:layout_height="fill_parent" android:id="@+id/webView" android:layout_alignParentTop="true" android:layout_alignParentLeft="true" android:layout_alignParentStart="true" android:layout_alignParentBottom="true" android:layout_alignParentRight="true" android:layout_alignParentEnd="true" tools:ignore="MissingConstraints" /> |
First of all, we have to copy the above code so that we can create a web interface of our android application and it can look like an android application. Through which you can convert the website to an android app.
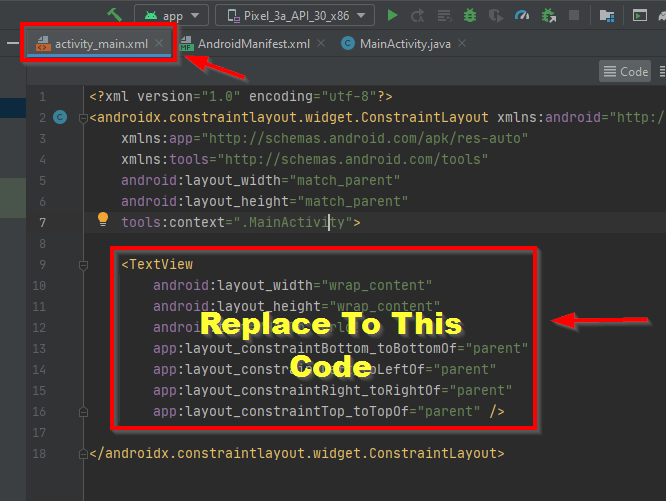
After copying the code, you have to come to the Activity_main.xml file and then the code section of the file will open in front of you, here you have to copy the section of the TextView and replace it with the code.
Keep one thing in mind that wherever you are asked to replace, it means that the code you have copied should be replaced with the code mentioned, that is, you have to delete the earlier code, and the code which you copied has to be pasted instead of the previous code,
MainActivity.java
|
1 2 3 4 5 6 7 8 9 10 11 12 13 14 15 16 17 18 19 20 21 22 23 24 25 26 27 28 29 30 31 32 33 34 35 36 |
import android.os.Bundle; import android.webkit.WebView; import android.webkit.WebViewClient; import androidx.appcompat.app.AppCompatActivity; public class MainActivity extends AppCompatActivity { String websiteURL = "https://hacknos.com/blog/"; // sets web url private WebView webview; @Override protected void onCreate(Bundle savedInstanceState) { super.onCreate(savedInstanceState); setContentView(R.layout.activity_main); //Webview stuff webview = findViewById(R.id.webView); webview.getSettings().setJavaScriptEnabled(true); webview.getSettings().setDomStorageEnabled(true); webview.setOverScrollMode(WebView.OVER_SCROLL_NEVER); webview.loadUrl(websiteURL); webview.setWebViewClient(new WebViewClientDemo()); } private class WebViewClientDemo extends WebViewClient { @Override //Keep webview in app when clicking links public boolean shouldOverrideUrlLoading(WebView view, String url) { view.loadUrl(url); return true; } } } |
After doing this, you have to copy the above code and then open Android Studio.
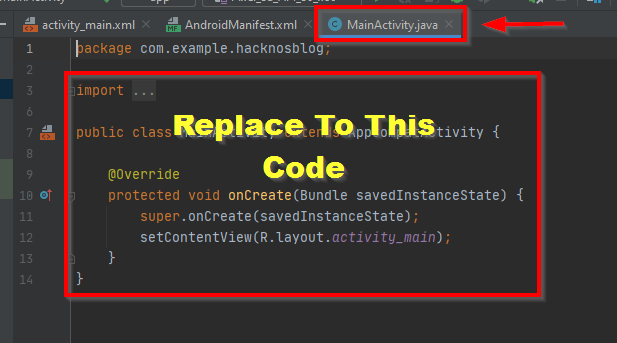
After this, you have to open the Mainactivity.java file and replace the code shown in the photo with the copied code. You should keep in mind that the code above which the red color box is made, that code You have to replace it with the code you copied or else that entire section.
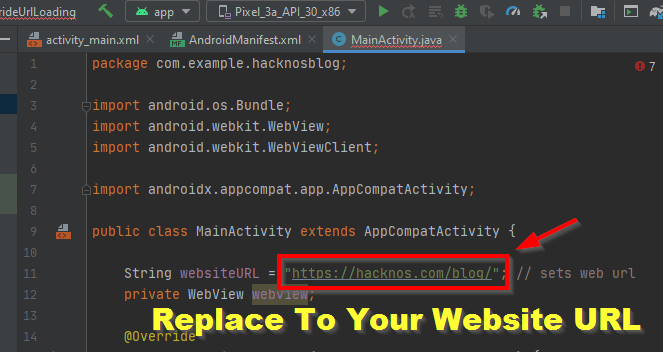
After pasting the copied code, you will get an interface like this, here you have to give the URL of the website on which you want to create your Android application in the section of the website URL. If you do not change the URL, then our website will open in your Android application.
2. Give Internate Permissions To Application
AndroidManifest.xml
|
1 |
<uses-permission android:name="android.permission.INTERNET" /> |
After this, the Android application you are making will have to be given permission from the Internet so that any person can access the Internet while using your application and can easily see your new posts and articles. For this, you have to copy the above code.
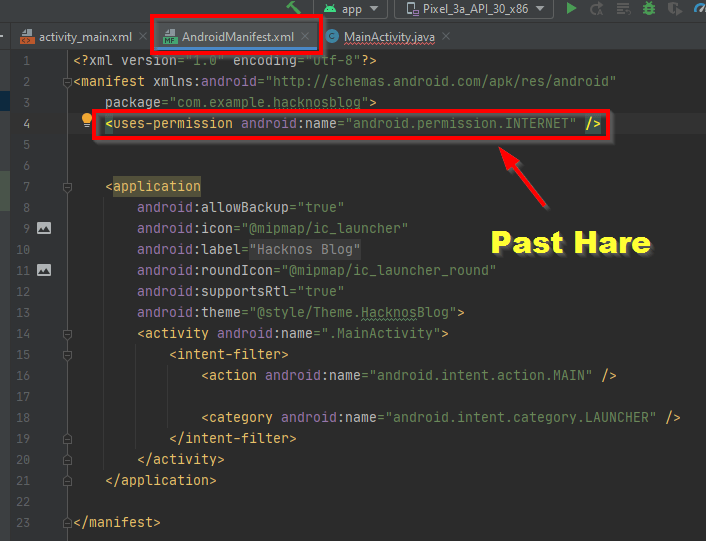
After copying the code, you have to come back to Android Studio and open the AndroidManifest.xml file, below the packet section given above, you have to paste the copied code as shown in the photo.
3. Add Some Professional Features – Convert a Website to Android App
After doing all this process, our android application is completely ready, now we will add some professional features to make this android application professional so that any viewer use your application then it should have a very good experience and He can tell maximum time on your articles or posts and your website can be user friendly with him.
3.1 Remove Header Bar From Application
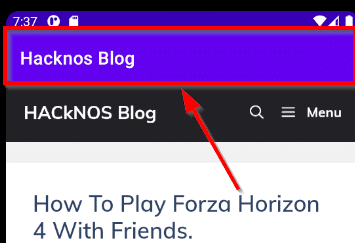
When we will open our Android application, we will be shown an interface like this, here we have to remove the header bar given above. Because it looks very useless, for this you will have to make some changes in the files of your application as you are making, after which the header section shown in your application will be removed.

To remove the section of a header from your application, first, you have to go to RES > VALUES > THEMES folder and apply the changes mentioned in both the given themes.xml files. You have to open these two files one by one Have to do it.
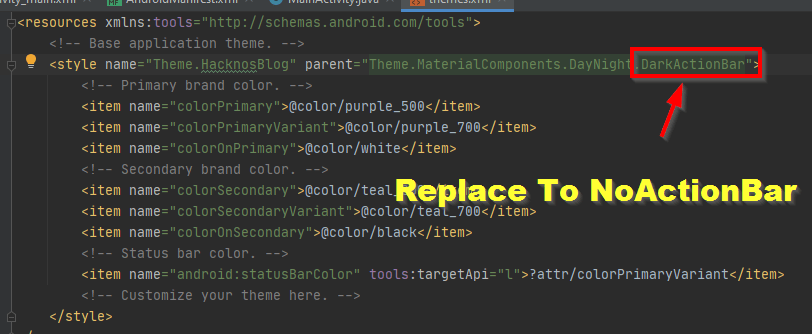
After opening the file, you will see an interface like this, here you have to replace DarkActionBar with NoActionBar in the third line above, due to which the above header bar will be removed from your Android application. You have to do this process in both files.
3.2 Add Custom Logo to our Application – Convert a Website to Android App
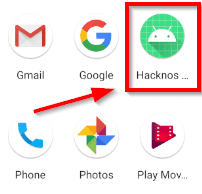
After this we will set the Logo of our android application which we want to give to our android application like when you create an android application then it’s by default Logo will be visible to you in the photo now we will change these Logo with the Logo created by us We will change it so that only the logo of our website is visible to the users using it.
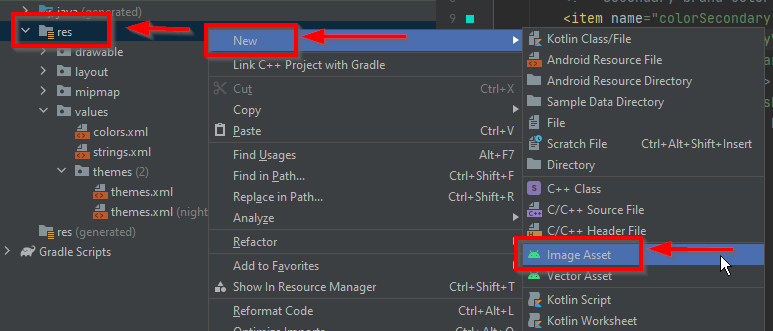
To change the logo of the Android application, first, you have to right-click on the RES folder from the folder given on the left side and then go to the section of New and click on the Image Asset option given below so that you can share your application with the people. able to set.
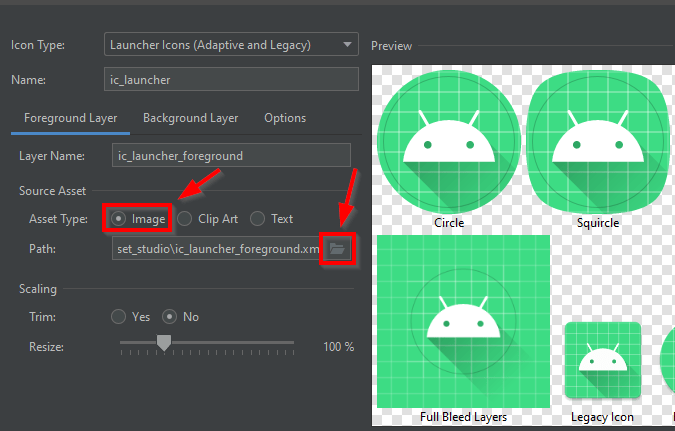
After that, an interface of this kind will open in front of you, here you will already see 1 person selected in the section of the image, to change it, you have to click on the folder button on the right and choose the one you want. The images of those people who want to be engaged have to be selected.
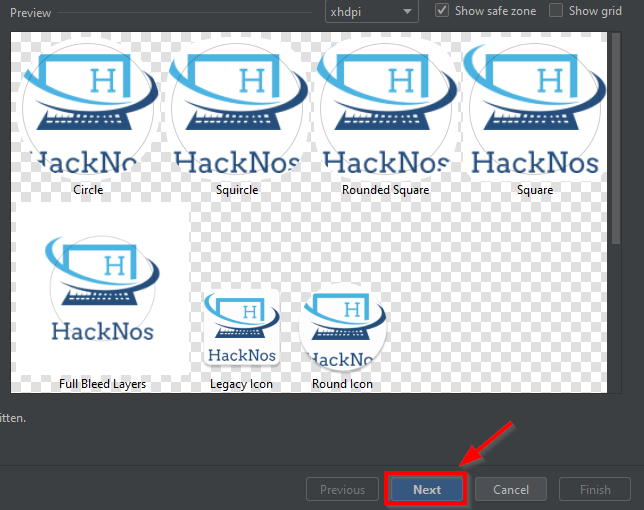
After selecting the image, some kind of interface will appear in front of you, you can select any layout for your Android application from here and then you have to click on the Next button.
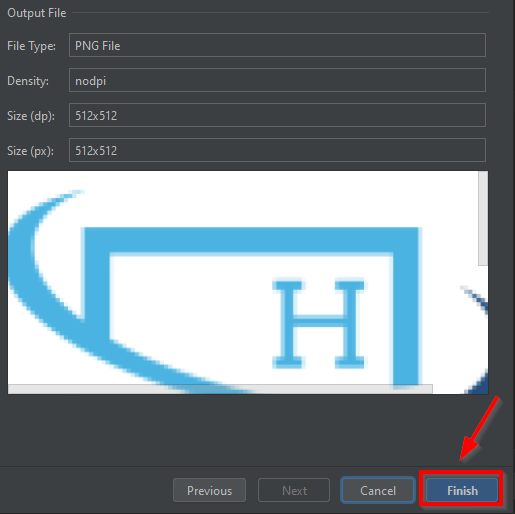
After doing this, you will see an interface like this, here you have to click on the finish button as if your people get attached to the application and the image file given by you is saved with the application.
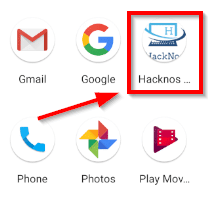
After this you can see that the Android application created by us is now visible on the phone in this way, you can change its logo according to your mind.
4. Internet Connection Error – Convert a Website to Android App
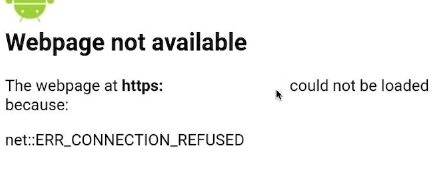
After this, we will put an Internet error in our application, which will appear as a professional error when viewed by the user. Which is looking very useless, now we will change it in a very professional way,
AndroidManifest.xml
|
1 |
<uses-permission android:name="android.permission.ACCESS_NETWORK_STATE"/> |
For this, you have to copy the code, which we will paste in our Android Studio, and change the network error interface.

After copying the code, you have to go to Android Studio and then open the AndroidManifest.xml file. After opening the file, copy and paste the code just below the line where you gave internet permission to the application.
MainActivity.java
|
1 2 3 4 5 6 7 8 9 10 11 12 13 14 15 16 17 18 19 20 21 22 23 24 25 26 27 28 29 30 31 32 33 34 35 36 37 38 39 40 41 42 43 44 45 46 47 48 49 50 51 52 53 54 55 56 57 58 59 60 61 62 63 64 65 66 67 68 69 70 71 72 73 74 75 76 77 78 79 80 81 82 83 84 85 86 87 88 89 90 91 92 93 94 95 96 97 |
import android.app.AlertDialog; import android.content.Context; import android.content.DialogInterface; import android.net.ConnectivityManager; import android.net.NetworkInfo; import android.os.Bundle; import android.util.Log; import android.webkit.WebView; import android.webkit.WebViewClient; import androidx.appcompat.app.AppCompatActivity; public class MainActivity extends AppCompatActivity { String websiteURL = "https://hacknos.com/blog/"; // sets web url private WebView webview; @Override protected void onCreate(Bundle savedInstanceState) { super.onCreate(savedInstanceState); setContentView(R.layout.activity_main); if( ! CheckNetwork.isInternetAvailable(this)) //returns true if internet available { //if there is no internet do this setContentView(R.layout.activity_main); //Toast.makeText(this,"No Internet Connection, Chris",Toast.LENGTH_LONG).show(); new AlertDialog.Builder(this) //alert the person knowing they are about to close .setTitle("No internet connection available") .setMessage("Please Check you're Mobile data or Wifi network.") .setPositiveButton("Ok", new DialogInterface.OnClickListener() { @Override public void onClick(DialogInterface dialog, int which) { finish(); } }) //.setNegativeButton("No", null) .show(); } else { //Webview stuff webview = findViewById(R.id.webView); webview.getSettings().setJavaScriptEnabled(true); webview.getSettings().setDomStorageEnabled(true); webview.setOverScrollMode(WebView.OVER_SCROLL_NEVER); webview.loadUrl(websiteURL); webview.setWebViewClient(new WebViewClientDemo()); } } private class WebViewClientDemo extends WebViewClient { @Override //Keep webview in app when clicking links public boolean shouldOverrideUrlLoading(WebView view, String url) { view.loadUrl(url); return true; } } } class CheckNetwork { private static final String TAG = CheckNetwork.class.getSimpleName(); public static boolean isInternetAvailable(Context context) { NetworkInfo info = (NetworkInfo) ((ConnectivityManager) context.getSystemService(Context.CONNECTIVITY_SERVICE)).getActiveNetworkInfo(); if (info == null) { Log.d(TAG,"no internet connection"); return false; } else { if(info.isConnected()) { Log.d(TAG," internet connection available..."); return true; } else { Log.d(TAG," internet connection"); return true; } } } } |
After this you have to copy the other given code.
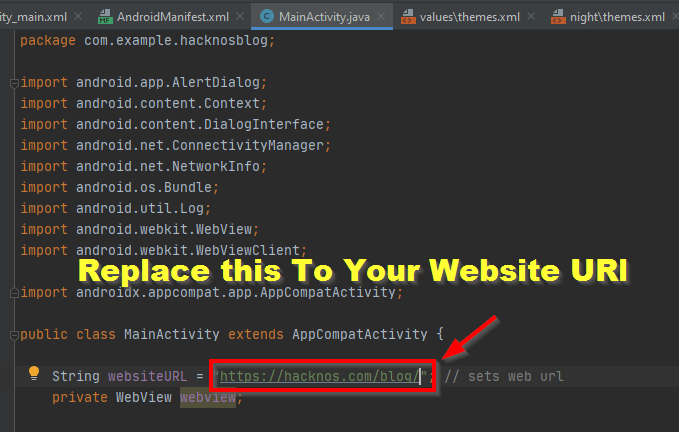
After copying the code, you have to open the MainActivity.java file. And all the code you have copied without the first line in the file has to be replaced with the code, keep in mind that you do not delete the package line given in the file at all.
After doing this, you have to paste the URL of your website back in the section of the Website URL on which you want to create an Android application.
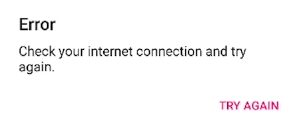
After this, you can see that now our internet connection error is appearing in such a way which is a good look and is easily understood by the user. This gives you another advantage, whenever someone opens your application without using the internet, then here the URL of your website is not shown to the user which was shown in the earlier internet connection error.
5. Back & Exit Feature – Convert a Website to Android App
After doing all this process, now we have to add features for exit and back in our android application because now as soon as you open any product or article and press the back button, it will automatically take your android The application will exit and you will have to open the Android application again.
Therefore, after pressing the back button in the application, we will give permission to go to the previous page and after going to the home page, as soon as someone presses the back button, a notification will be shown to accept it. We will add all these features to your application.
MainActivity.java
|
1 2 3 4 5 6 7 8 9 10 11 12 13 14 15 16 17 18 19 20 |
//set back button functionality @Override public void onBackPressed() { //if user presses the back button do this if (webview.isFocused() && webview.canGoBack()) { //check if in webview and the user can go back webview.goBack(); //go back in webview } else { //do this if the webview cannot go back any further new AlertDialog.Builder(this) //alert the person knowing they are about to close .setTitle("EXIT") .setMessage("Are you sure. You want to close this app?") .setPositiveButton("Yes", new DialogInterface.OnClickListener() { @Override public void onClick(DialogInterface dialog, int which) { finish(); } }) .setNegativeButton("No", null) .show(); } } |
First of all, you have to copy the above code as if you can add the feature of back and exit in your android application.
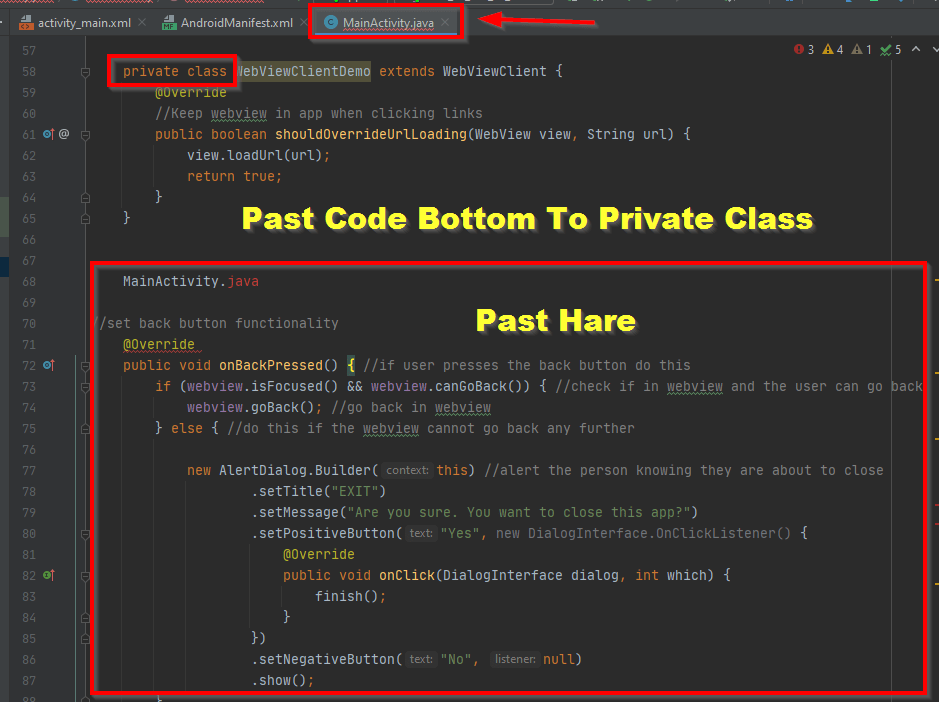
After that, you have to go to Android Studio and then open the Mainactivity.java file. After opening the file, you have to scroll a little from the bottom. After scrolling down the code of the file, the section of the private class will open in front of you.
After this, the code copied by you has to go to the end of the private class section where it is ending and paste it by pressing the enter button as shown in the photo.

After this, you can see that whenever a person wants to exit from our application now, then some kind of notification will come in front of him and he can come out of the application by clicking on the Yes button and after pasting all these codes After pressing the back button in your application, the previous page will open.
6. Swipe Down to Refresh – Convert a Website to Android App
After adding all these features to our application, now we will add one last feature to our android application, due to which as soon as you swipe down, the refresh will start in your android application and any new post by you.
Or if the product is added to your website, it will automatically be updated in your Android application. To add this feature to your Android application, you have to paste some code scores in Android Studio.
activity_main.xml
|
1 2 3 4 5 6 7 8 9 10 11 12 13 14 15 16 17 18 |
<androidx.swiperefreshlayout.widget.SwipeRefreshLayout android:id="@+id/swipeContainer" android:layout_width="match_parent" android:layout_height="match_parent"> <WebView android:layout_width="fill_parent" android:layout_height="fill_parent" android:id="@+id/webView" android:layout_alignParentTop="true" android:layout_alignParentLeft="true" android:layout_alignParentStart="true" android:layout_alignParentBottom="true" android:layout_alignParentRight="true" android:layout_alignParentEnd="true" tools:ignore="MissingConstraints" /> </androidx.swiperefreshlayout.widget.SwipeRefreshLayout> |
First of all, you have to copy the code shown above and then open your Android Studio.
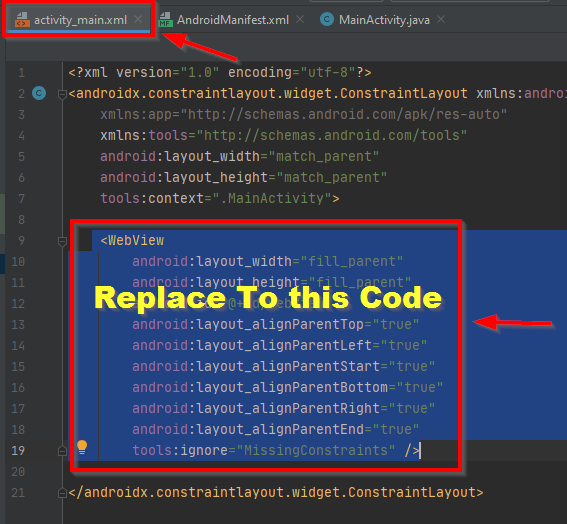
After opening Android Studio you have to open the Activity_main.xml file and replace which section of Webview with the copied code. Keep in mind that the section which is visible inside the red box in the photo, you have to replace with the same code.

After doing this, you will see some kind of error in front of you, you have to right-click on it and then click on show context action.

After this you will see all these futures, here you have to click on the first feature. After this, a file will be downloaded in your Android Studio and the error shown to you will be solved automatically.
MainActivity.java
|
1 |
SwipeRefreshLayout mySwipeRefreshLayout; |
After this you have to copy the above code and go back to Android Studio.
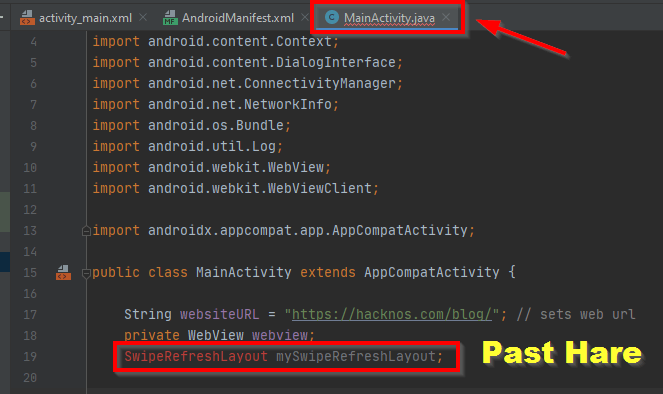
To paste the copied code, you have to open the MainActivity.java file and then paste the code under the Private Webview section.

After pasting the code an error will appear again in front of you, you have to right-click on it and click on show context actions.

After clicking on Show Context Action, you will be shown some options, out of which you have to click on the first option Import Class. And your error will be solved automatically.
MainActivity.java
|
1 2 3 4 5 6 7 8 9 10 11 |
//Swipe to refresh functionality mySwipeRefreshLayout = (SwipeRefreshLayout)this.findViewById(R.id.swipeContainer); mySwipeRefreshLayout.setOnRefreshListener( new SwipeRefreshLayout.OnRefreshListener() { @Override public void onRefresh() { webview.reload(); } } ); |
After this you have to copy the above code and go back to your Android Studio.
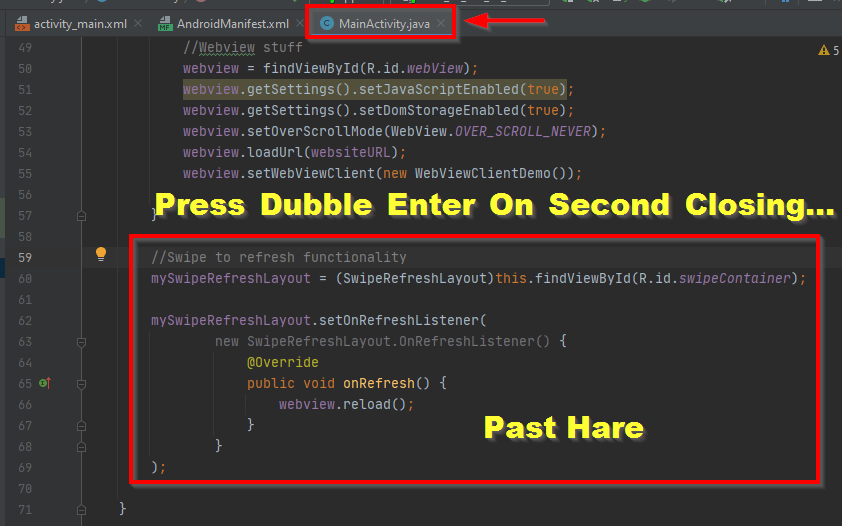
After coming to Android Studio, you have to open MainActivity.java and after scrolling the code a little from the bottom, you will see the section of Webview stuff, here you have to double the code copied before the second closing tag After pressing enter, paste it as you see in the photo.
MainActivity.java
|
1 2 3 4 5 6 7 8 9 10 11 12 13 |
private class WebViewClientDemo extends WebViewClient { @Override //Keep webview in app when clicking links public boolean shouldOverrideUrlLoading(WebView view, String url) { view.loadUrl(url); return true; } @Override public void onPageFinished(WebView view, String url) { super.onPageFinished(view, url); mySwipeRefreshLayout.setRefreshing(false); } } |
After this you have to copy the above code from the back. And have to open Android Studio.

After opening Android Studio, you have to go back to the MainActivity.java file and after selecting the private class which you see in the photo, replace it with the copied code.
7. Screen Rotation – Convert a Website to Android App
AndroidManifest.xml
|
1 |
android:screenOrientation="portrait"> |
Now we will add a rotation feature in our android application due to which the views will get great experience in engaging with our android application. To add the rotation key feature to your Android application, copy the above code.
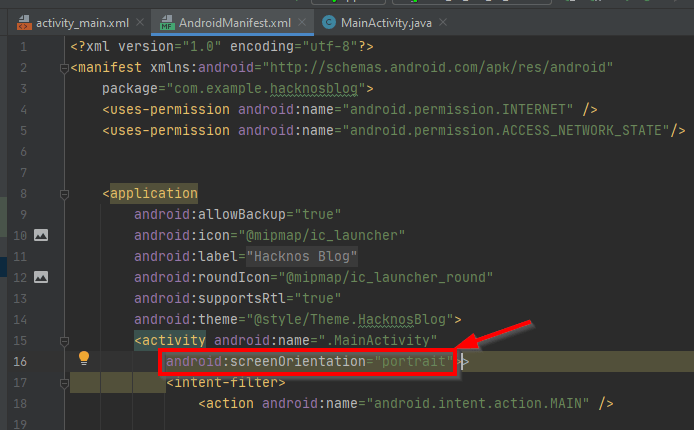
After this, you have to open Android Studio and then open the AndroidMainfest.xml file. After opening the file, you have to paste the copied code before the closing time of MainActivity in the section of the code. After this, the rotation feature will be added to your Android application and now you can use your application.
8. All MainActivity.Java Code
If you have done the Android application till this process, then your Android application is completely ready, now you can give it to any viewer for testing and see what kind of experience your android application provides to the viewer.
If you make any mistake in this whole process then you have to copy all the above-mentioned code and then go to Android Studio.
MainActivity.Java
|
1 2 3 4 5 6 7 8 9 10 11 12 13 14 15 16 17 18 19 20 21 22 23 24 25 26 27 28 29 30 31 32 33 34 35 36 37 38 39 40 41 42 43 44 45 46 47 48 49 50 51 52 53 54 55 56 57 58 59 60 61 62 63 64 65 66 67 68 69 70 71 72 73 74 75 76 77 78 79 80 81 82 83 84 85 86 87 88 89 90 91 92 93 94 95 96 97 98 99 100 101 102 103 104 105 106 107 108 109 110 111 112 113 114 115 116 117 118 119 120 121 122 123 124 125 126 127 128 129 130 131 132 133 134 135 136 137 |
import android.app.AlertDialog; import android.content.Context; import android.content.DialogInterface; import android.net.ConnectivityManager; import android.net.NetworkInfo; import android.os.Bundle; import android.util.Log; import android.webkit.WebView; import android.webkit.WebViewClient; import androidx.appcompat.app.AppCompatActivity; import androidx.swiperefreshlayout.widget.SwipeRefreshLayout; public class MainActivity extends AppCompatActivity { String websiteURL = "https://hacknos.com/blog/"; // sets web url private WebView webview; SwipeRefreshLayout mySwipeRefreshLayout; @Override protected void onCreate(Bundle savedInstanceState) { super.onCreate(savedInstanceState); setContentView(R.layout.activity_main); if( ! CheckNetwork.isInternetAvailable(this)) //returns true if internet available { //if there is no internet do this setContentView(R.layout.activity_main); //Toast.makeText(this,"No Internet Connection, Chris",Toast.LENGTH_LONG).show(); new AlertDialog.Builder(this) //alert the person knowing they are about to close .setTitle("No internet connection available") .setMessage("Please Check you're Mobile data or Wifi network.") .setPositiveButton("Ok", new DialogInterface.OnClickListener() { @Override public void onClick(DialogInterface dialog, int which) { finish(); } }) //.setNegativeButton("No", null) .show(); } else { //Webview stuff webview = findViewById(R.id.webView); webview.getSettings().setJavaScriptEnabled(true); webview.getSettings().setDomStorageEnabled(true); webview.setOverScrollMode(WebView.OVER_SCROLL_NEVER); webview.loadUrl(websiteURL); webview.setWebViewClient(new WebViewClientDemo()); } //Swipe to refresh functionality mySwipeRefreshLayout = (SwipeRefreshLayout)this.findViewById(R.id.swipeContainer); mySwipeRefreshLayout.setOnRefreshListener( new SwipeRefreshLayout.OnRefreshListener() { @Override public void onRefresh() { webview.reload(); } } ); } private class WebViewClientDemo extends WebViewClient { @Override //Keep webview in app when clicking links public boolean shouldOverrideUrlLoading(WebView view, String url) { view.loadUrl(url); return true; } @Override public void onPageFinished(WebView view, String url) { super.onPageFinished(view, url); mySwipeRefreshLayout.setRefreshing(false); } } //set back button functionality @Override public void onBackPressed() { //if user presses the back button do this if (webview.isFocused() && webview.canGoBack()) { //check if in webview and the user can go back webview.goBack(); //go back in webview } else { //do this if the webview cannot go back any further new AlertDialog.Builder(this) //alert the person knowing they are about to close .setTitle("EXIT") .setMessage("Are you sure. You want to close this app?") .setPositiveButton("Yes", new DialogInterface.OnClickListener() { @Override public void onClick(DialogInterface dialog, int which) { finish(); } }) .setNegativeButton("No", null) .show(); } } } class CheckNetwork { private static final String TAG = CheckNetwork.class.getSimpleName(); public static boolean isInternetAvailable(Context context) { NetworkInfo info = (NetworkInfo) ((ConnectivityManager) context.getSystemService(Context.CONNECTIVITY_SERVICE)).getActiveNetworkInfo(); if (info == null) { Log.d(TAG,"no internet connection"); return false; } else { if(info.isConnected()) { Log.d(TAG," internet connection available..."); return true; } else { Log.d(TAG," internet connection"); return true; } } } } |
After coming to Android Studio, you have to open the MainActivity.java file and first of all select all the code except the line and replace it with the copied code. So that if you have any mistake in this code then it will be fixed automatically.
You should keep one thing in mind that when you replace this code with the original code, it will automatically change your URL, then you have to give your website URL instead of URL. After that, you can use the android application.
Time of FAQs
If you want to make an Android application for your website which supports both Android and ISO devices, then you do not have to do much for it, you can do it yourself without any Android developer, for this you will need android-studio In which by doing a little coding, you can create a professional Android application for yourself, which will look exactly like your website and when any person opens it, the contact that is on the website provided by you is your Android application. From where he can purchase or rate your articles.
If you want to make a professional and exactly like your website looking Android application for your website, then you do not need to pay any money for this. You can easily do this work yourself in one and a half hours through android-studio software. When you will create the Android application, it will be fully linked to your website, through which all the products and articles on your website will be displayed in the Android application. If you do not have time for this, then you can also hire an android developer who can create a professional Android application for you, whose charges can range from $2500 to $10000.
When you make any of your android application then you can easily earn money from that android application. Just like ads are run on the website through Google Adsense and you get some percent of its money, similarly Google has also opened an ad platform for Android applications, through which you can run ads on any of your Android applications. And you are given money for that. If you want to run ads on your application, then you have to take the approval of Google Admob, after that you can earn money by running ads on your application.

